Pages

Showing posts with label DIY. Show all posts

Thursday, October 29, 2015

That Thing You Do! Fan Costume


Is there anyone else out there besides me who STILL loves the movie That Thing You Do!? Raise a hand or let out a scream! I first fell in love with this movie when it hit theaters in 1996. I was 11 years old, and was obsessed with it, along with all of my friends. I owned the soundtrack and listened to it on repeat so many times that I think I must have really annoyed my parents. I always tried to do my hair like Liv Tyler's, and knew every line of the movie by heart. There's something really wholesome and sweet about this film that I always loved, and the soundtrack is amazing. (I sing Mr Downtown to myself ALL the time).

I thought it would be fun to add another felt t-shirt DIY to the mix and make a fun little last minute Halloween costume for those of you who would want to pay homage to the best movie of the 90s (in my opinion). 

Just to refresh your memory, this costume idea is based on the scene in the film where the band finds out they're going straight to California to be in a movie and play the Hollywood Television Showcase. "C-c-california?" "Disneyland???" When they walk out of their dressing room to jump into the car that's waiting for them to take them to the airport, a bunch of crazy fans are there, and one is holding a sign that says SHADES with a big heart around it, 'cause we all know, Tom Everett Scott's character, Guy Patterson, was the reason they became famous. So there ya go! From inspiration to real life Halloween costume! 


::MATERIALS::
1) Plain White T-shirt (I found mine at Michael's)
2)Self-Adhesive Letter Stickers (also found at Michael's in the sticker section)
3) Sheets of felt in lime green, raspberry, taxi yellow, and grape (to match the colors of the title in the movie)
4) Hot glue gun + glue
5) Scissors
6) Your favorite accessories - cat eye sunnies, chiffon hair scarf, leggings or capri pants

::FOR THE POSTER::
1) White scrapbooking paper 
2) Pink scrapbooking paper
3) Tape or glue
4) Scissors

This is the simplest DIY in the world! All you have to do is cut out strips of the felt to act as a backing to each of your letters (except for the word THAT which I only used one single piece of felt for). Once you have each square/rectangle cut out, apply your letters directly on to the little squares of felt! Then, hot glue the pieces all down in place, and voila. So easy! I used the DVD cover of the movie as a reference for how I laid the letters out, as they're not totally uniform and straight across. As for the poster board, just cut out a nice big heart (I estimated the size of mine), use glue or tape to stick it down in the middle of your white paper, and add an arrow going through it with a sharpie, and you have your very own Shades fan sign!


 I absolutely loved how the costume turned out. It only cost me around $10-$15 because I already had most of the supplies and outfit accessories!  ** If you make this, be sure to tag circusofcakesxhalloween and tag me @circusofcakes in your posts so I can see your creations!**


Also, don't forget about my sweet DIY Ice Cream Sprinkles tee idea from a few posts back! 

Actual movie poster for reference:


Monday, October 5, 2015

Birthday Cake Caramel Pumpkins + a GIVEAWAY!


One of my favorite things to do when fall comes around is to decorate pumpkins, and ever since I came across this adorable box of birthday cake caramels while browsing at Sugarfina, I thought it would be really fun to paint cute little white pumpkins to look like the caramels, and I'm pretty happy with the results! It's super easy to do, too!


::Supplies::


 One medium sized paintbrush, preferably a large area flat brush
Acrylic Paint in your three favorite colors for the confetti, and one tube of white acrylic paint
Small white pumpkins (I purchased 8-10)
A package of small circular foam stamps (I found them in the section where the tie dye stuff is, and they come in all different sizes)

(I purchased all craft supplies from Michael's, and the pumpkins from Trader Joe's


::How-To:

1) Get out your white paint, put some of it into a disposable bowl or if you have a reusable empty paint palette, squirt it in there
2) Take your brush, dip it into the paint, and then cover the whole pumpkin in that white paint, leaving your stems bare. You'll want to do this to all of them, and make sure to get the white paint completely covering each one, getting as close to the bottom as possible.
3) Let the pumpkins dry overnight.
4) When they're all dry, start stamping on your confetti! There's no special order to it. You can make the colors as random as possible and they can be placed in any spot! I made some of mine overlap, just how real confetti would look if it was thrown around.

And that's it! Acrylic Paint dries really fast, and also washes off with water while still wet, so be wary of that. 


Now, for the fun part... I'm giving away a box of these yummy Sugarfina Birthday Cake Caramels to three lucky people! Just head on over to my Instagram page to enter (@circusofcakes). Yay! GOOD LUCK!

Friday, September 25, 2015

DIY Ice Cream Sundae Outfit


 Everyone who knows me, knows how much I love ice cream + sprinkles, and since Halloween is coming up, I thought it could be fun to create an ice cream cone costume! But then I got to thinking.. what if I created an OUTFIT that was wearable for the every day? And then I came up with this little number! Instead of creating a cherry stem for your head, I thought a simple red headband would work, and it's something you don't have to spend a lot of money on! I happened to already have one, which was helpful.

The shirt and other supplies:

I bought a simple white t-shirt at Michaels, and about five different colored felt sheets (baby blue, pink, yellow, red, and brown, 39 cents each, woop woop). I cut out three of each color into the shapes of jimmies. making sure I rounded all of the edges with my scissors. I guessed the length and width - you can make them as big or as small as you want! and hot glued them in different places all over the top half of the shirt. I would suggest laying them out in your preferred design and take a photo of it so you can remember what you did, before gluing them down. I am not the crafty type by any means, and this was honestly SO easy to make and took such little time. Once I had the shirt and the headband, I was on a hunt for a nude colored bottom that I could afford. I made a visit over to my local Forever21, and found this adorable faux leather mini skirt, and it's the perfect addition! I completed the look with a simple skinny red belt (which I already had in my closet), and put on my favorite pair of Bait Footwear flats and I feel like a walking ice cream cone and I am VERY excited about it. :) The whole DIY look cost me just under $30, and I love how it all turned out! I hope you love it, too!

and the final look! i'm obsessed!


What You'll Need:

White T-shirt (can be found at any big craft supply store)
Felt sheets in assorted colors (I bought five colors, but you can use as many/as little as you want!)
Hot glue gun + glue 
Scissors
Nude colored skirt/shorts or leggings (My skirt can be found HERE)

Optional Items: 

Red headband
Skinny belt in your color of choosing (I happen to love red - here's a cute one that's reversible! also this darling pink one here )
Pastel flats (Mine can be found HERE)  
 

Thursday, June 18, 2015

Mini Donut Pancakes


Back when we were still all crazy about National Donut Day, I had a strange idea. As I was browsing for dinner options in the supermarket, I noticed those sinful boxes of frozen eggo pancakes in the frozen breakfast aisle, and then I remembered they made them in MINI version! So I took the box home, let it defrost for a while, and took one out to see what I could do with it. I haven't really seen or eaten one of these guys in a long time but I used to loooove them as a kid. So I punched a hole out of the middle of one of them, covered it with frosting, poured on a handful of sprinkles, and voila! Mini donut pancakes! They also look like mini donut bagels, too! In fact, more so like the bagels. These were actually SO easy to make and aren't they just adorable? Not half bad tasting, either! Here are the ingredients:

Punching a hole out with my thumb. Or you could use something like a small cookie cutter instead. Just be aware that they fall apart preeeetty easily, so use a light hand on it!
 

Laying down the frosting
 
And finally, the final product. I'm drooling just looking at them now.
 
  
I also thought it could be fun to make these as a special treat for a friend who could be celebrating a birthday or other life achievement. Just stick a pretty candle in there and you're good to go!
 

Now hop to the store and try these at home! <3

 Pretty plates purchased at Urbanic
Plates designed by Meri Meri

Friday, June 5, 2015

Happy National Donut Day!


It's here it's here! My favorite sugary day of the year! There's something just SO happy about little fried balls of dough that are covered in sprinkles and frosting. I've fully embraced this evergrowing trend, and I love it! I thought it would be fun to make little mini donuts after I discovered this cute little donut maker I forgot that I had, and then I thought they would look SUPER cute on top of cupcakes!

I took the funfetti vanilla cupcake recipe from Magnolia Bakery and the recipe called for two types of flour - cake flour as well as self rising flour, and let me tell you - wow. They are jumbo and so fluffy! I'm going to do that with all of my cupcakes from now on! The frosting is store bought, which I'm not proud of, but hey, I had to cut corners somewhere. The donut recipe is a basic one that you can find if you look up "baked mini donuts" and it includes nutmeg, which I'm not a huge fan of, but they were tasty!

Also, thanks to Urbanic for having the loveliest backdrop for my cupcakes, Toot Sweet for the little plates, and to Meri Meri for the adorable temp tattoos that I used as decoration for my table!

I can't get over how itty bitty these guys are! I'm obsessed!


Sources:

Paper and Plates- Urbanic / Toot Sweet
Temporary Tattoos- Purchased at Urbanic, designed by Meri Meri
Cupcake Liners and Sprinkles- Sur La Table
Recipe for cupcakes- via POPSUGAR

AND FINALLY... congrats to the winner of the Instagram contest that I've been co-hosting with Karen of Little Sweet Thing! The lucky lady won herself some of my favorite pieces that Karen makes, including donut earrings, a donut ring, AND donut bobbi pins! Yay! Hope you enjoy!

Friday, March 20, 2015

Jeepers Peepers


It's almost Easter, you guys! I've always loved this holiday. The neighborhood that I grew up in was filled with families when I was little, and every year, the parents would get together and hide eggs all over their yards. The kids would get together and do a major Easter egg hunt throughout the whole neighborhood, and afterwards, we would end up at one of the houses for a pot luck. Nowadays, I spend my time with Chris at his parents' house and we have a big Italian Easter fest. I thought I'd jazz things up a bit and try my hand at crafting, so here is a cute little DIY for those who have been thinking about making your own hair accessories! These would make a great gift for a friend, or to wear to your own Easter party.


I picked up everything at Michaels, except for the candy that I bought at my local grocery store.
All it takes is a hot glue gun, ribbon wide enough to fit on top of your plastic headbands and hair clips, and candy! Just glue on your ribbon, then add whatever candy you like! I went for peeps, m&m's, and Easter eggs.

Now let's get started:


I love these little birdie clips I made, with little birds and m&m's! So cute! 


Next up is a peeps headband! This was by far the hardest to construct because hot glue does not want to stick to these guys. But I'm loving the result! The one tip I have for this is to do two rounds of glue for each peep.


And my favorite of all, the m&m and eggs headband! This is so cute and not as fragile as the other one. I feel like I can wear this on any given day and that no one would even know that it's made of candy! Or maybe not. But either way, it's a good one!

I hope you've enjoyed the post! If you have done some Easter DIYs, I'd love to see! <3


Tuesday, September 30, 2014

Bookshelf Wallpaper DIY


When Chris and I first moved into our 1920s apartment, it took us a bit of time to find the perfect bookshelf for our living room. We ended up purchasing our black and white simple shelving unit from Ikea, and I was very happy with it until recently. I started to feel like it was just blending in with the white wall behind it, and I knew I had to do something to make it stand out, but painting it was out of the question because I am TERRIBLE at painting anything. So, I decided to pick up some pretty paper and glue it on. And... it worked! It's SO easy and such a genius idea, because it's cheap, doesn't take that long to do, and adds SO much in such a small way! I had thought about adding colored paper to all of the walls behind each shelf, but decided against it at the last minute. I'm so glad that I did because that would have been way too overwhelming.

This is how it used to look:


The Look //
Go to one of your favorite stationary stores that carries fun wrapping paper (I went to Paper Source for mine, and I purchased the fine paper, which I was told would hold up better than the regular paper wrapping paper), and pick out your paper! Next, be sure to pick up a bottle of modge podge and a foam brush to apply the glue with. Make sure to pick the right kind of glue! I chose matte because I didn't think that a shiny look would be good but to each your own!


The Steps //
First, you will want to take your paper and cut it to the length of the area you're trying to cover. Once you do that, you will take your modge podge and brush the glue all over the area that you are going to adhere the paper to. Next, lay the paper down as flat as you can, smooth the paper out so that there are no bubbles, and then go over the paper with more modge podge and voila!


Thanks so much to Paper Source for providing me the cutest paper, and for always giving me great inspiration! You can find all necessary supplies at Paper Source, so yay for a one-stop-shop and a three step process!

And here's a photo of Ringo being cute as usual.. Oh! If you have a cat, be aware that they might get curious about the new addition to your furniture and he might try to scratch it off when you're not home (that's how I figured out how easy it is to remove the paper if you choose to switch up the print)


Wednesday, November 23, 2011

Thanksgiving prep

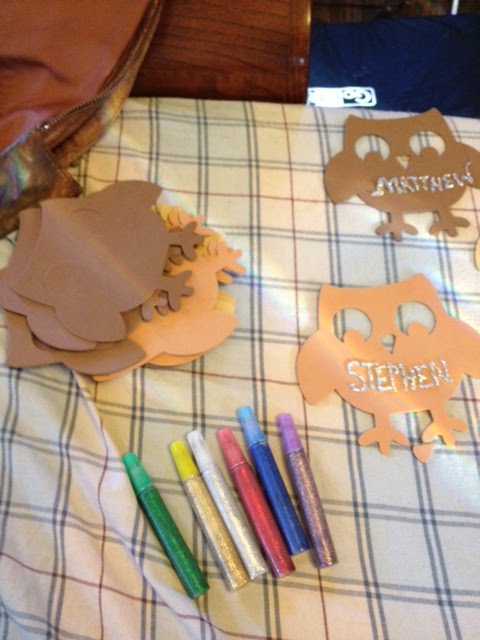
The past few days have been filled with baking, crafting, and making lists. Yesterday I tried my hand at baking a green tomato pie, which actually isn't very Thanksgiving-themed, but we had all the ingredients in the kitchen and I thought it would be fun to try something new. I also went to Michaels and picked up glitter glue and foam owls to make for our DIY placecards. They're a little childish, but so cute, I just couldn't resist. I honestly don't have a lot of money right now because I lost my job, so I'm impressed that I was able to put together cute little place cards for around $6 total ($1.99 for the glitter glue and $3.99 for the owls). I also bought a stack of flashcards for a dinner table activity that I'll share later.


Adding the cubes of butter...


It actually was pretty tasty! I'm usually a sweet pie lover, not so much a savory. But it's definitely worth trying.


They're not finished yet. I was thinking of drawing little acorns on the back, or writing a Thanksgiving-themed phrase, so that everyone gets something different, but I'm starting to run out of that glue.
'